Setup Jetbrains Clion IDE with STM32CubeMX project for development on STM32 Microcontrollers – Windows
Similar to my previous blog post on programming and debugging STM32 Microcontrollers with Clion IDE on Mac, I want to share a similar easy setup guide for Windows with you. The only difference is that you have to install OpenOCD and ARM GNU eabi Toolchain a little bit different. This tutorial should work for all STM32 based Microcontrollers with a debug interface (JTAG) that is supported by OpenOCD. I used a STM32 Nucleo-L4R5ZI board.
In this tutorial you have to install (if not already done) Java (11+ for example), Clion IDE, STM32 CubeMX, OpenOCD, and ARM GNU eabi Toolchain.
1. Install Java and STM32 CubeMX
You can install Java „regular“ or via a packet manager like choco (Chocolatey) or winget. Make sure Java can be found in PATH. To install STM32CubeMX you have to download the ZIP file from their website. If you don’t want to create an account for that, use one from bugmenot. The EXE-file inside the downloaded ZIP is actually 100% Java. If it doesn’t start on double click, just run it with java -jar <path-to-exe>. Same applies for the final installed exe file when the installer is done. If it doesn’t start, always start it with java -jar <path-to-exe>.
2. Install ARM GNU eabi Toolchain
Download the installer from developer.arm.com. During install make sure to checkmark the option to add it to PATH. Otherwise you have to add C:\Program Files (x86)\GNU Arm Embedded Toolchain\<version>\bin manually to the PATH environment variable.
3. Install OpenOCD
Next you have to install OpenOCD from their website. Download the .7z-File and extract it. Put it for example in C:\Tool\openocd (they don’t have an installer) and add this path to your system PATH environment variable. This is the path you have to enter in Clion later in the OpenOCD configuration dialog.
4. Install Clion
Install Jetbrains Clion IDE from their website.
5. Start STM32CubeMX and Generate a Project
Now lets put everything together. Generate a project in CubeMX, select your board and generate the code. In the Project Manager window of CubeMX you have to set “STM32CubeIDE” as IDE and checkmark “Generate Under Root”. More details on this can be found on the support link on the bottom of the page.
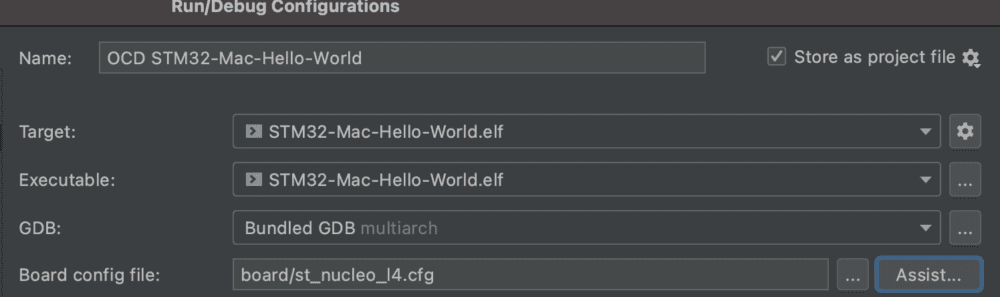
Afterwards you start Clion and open the *.ioc-file generated by CubeMX. Clion will automatically generate a CMakeLists.txt file and should find “arm-none-eabi-gcc” (ARM Gnu toolchain) which we installed in a previous step. CubeMX and Clion will use the same directory for this project! Before you run your application, you have to configure the board in the dialog. Click assist and select your board as shown in the screenshot below:
Hope it works! Happy coding and debugging!
0 Comments