Writing a Linux Driver for QEMU’s Debugcon Device
Update: Since Cloud Hypervisor release v38, you can also run a Linux with this driver in Cloud Hypervisor and see the output.
In earlier blog posts, I discussed QEMU’s debugcon device and presented a minimal driver for it written in x86 assembly. In this blog post, we go a little further and write a driver for Linux in C. The driver should provide a /dev/debugcon character device so that processes can open the driver device file and write data to it. Hence, the command $ echo "hello from Linux" > /dev/debugcon writes to the debugcon device and the VMM (Cloud Hypervisor or QEMU) captures that data. Only one device at a time should be able to use the device.
My project is on GitHub and the README plus the (relatively little lines of) code are already well-suited to understanding basic relations between different components – assuming you have basic low-level programming and Linux knowledge. The GitHub repository contains an easy way to build and run a demo with Nix. However, in this blog post, I’d like to highlight a few key points of the driver.
I decided to create the driver as out-of-tree module. In my previous blog post, I described how one can package them with Nix, so check it out, if you want to understand that part.
The Driver
Most of the code (~130 lines without comments) is necessary boilerplate code for a Linux driver: Initializing the driver, registering a character device with all its necessary steps, and registering a device node (/dev/debugcon). A character device is a kernel abstraction that allows user applications to use read(), write(), open(), and so on. You can find the initialization of the character device in the debugcon_module_init function. Note how I need multiple ugly C-typical error checking ifs. I’m looking forward to Rust in the kernel so much!
/**
 * Module/driver initializer. Called on module load/insertion.
 *
 * @return success (0) or error code.
 */
static int __init debugcon_module_init(void) {
    int rc;
    pr_info("%s", __FUNCTION__);

    rc = alloc_chrdev_region(&dev_num, 0, CHR_DEV_COUNT, "debugcon");
    if (rc) {
        pr_err("Failed to allocate chrdev region\n");
        goto end;
    }

    dev_major = MAJOR(dev_num);

    debugcon_class = class_create(THIS_MODULE, "debugcon");
    if (IS_ERR(debugcon_class)) {
        rc = PTR_ERR(debugcon_class);
        pr_err("Failed to create driver class\n");
        goto end;
    }

    // Set permissions for user processes.
    debugcon_class->devnode = debugcon_devnode_mode;

    cdev_init(&chrdev, &fops);
    chrdev.owner = THIS_MODULE;

    rc = cdev_add(&chrdev, dev_num, 1);
    if (rc) {
        pr_err("Failed to add char dev\n");
        goto end;
    }

    // Create device node /dev/debugcon
    device = device_create(debugcon_class, NULL, dev_num, NULL, "debugcon");
    if (IS_ERR(device)) {
        rc = PTR_ERR(device);
        pr_err("Failed to call device_create\n");
        goto end;
    }

    pr_info("QEMU Debugcon Driver inserted: /dev/debugcon available\n");

  end:
    return rc;
}
This is all the code necessary for creating a character device in a Linux driver. Hint: However, that the device appears in /dev/ requires some userland support. Either via mknod, udev or mdev (the latter in busybox-environments). I will come back to this later in the testing infrastructure when I talk about the initrd.
With cdev_init(&chrdev, &fops); I associate certain file operations with the device:
struct file_operations fops = {
        .owner = THIS_MODULE,
        .open = device_open,
        .write = device_write,
        .release = device_release
};
In device_open, the driver needs to ensure that only one single user at a time can “own” the device. In device_write, the user buffer must be written to the I/O port, similar as in my assembly driver. Finally, device_release must ensure that the next user can open the driver.
device_open
int device_open(struct inode * ino, struct file * f) {
    int acquired_exclusive_access = 0;
    int expected = 0;
    int new_state = 1;

    pr_info("%s called", __FUNCTION__);

    acquired_exclusive_access = __atomic_compare_exchange(
            // device_is_opened is global variable of type int
            &device_is_opened,
            &expected,
            &new_state,
            0,
            __ATOMIC_SEQ_CST,
            __ATOMIC_SEQ_CST
    );
    if (!acquired_exclusive_access) {
        pr_info("Another device has the driver file already open");
        return -EBUSY;
    } else {
        pr_info("Acquired exclusive access to device");
    }

    return 0;
}
Instead of using a mutex, I decided to use an atomic operation to protect the global variable device_is_opened. It is sufficient and has less overhead than a mutex. If a user opens the device while device_is_opened == 1, then the program receives -EBUSY. Otherwise, success (0) is returned.
device_write
In this callback, we need a loop to write the user’s data byte-by-byte into the I/O port (0xe9) of the debugcon device.
ssize_t device_write(struct file * f, const char * buf, size_t n, loff_t * off) {
    pr_info("%s called", __FUNCTION__);
    for (int i = 0; i < n; i++) {
        asm volatile (
                "outb %%al, %%dx"
                :
                : "a" (buf[i]),
                  "d" (QEMU_DEBUGCON_IO_PORT)
                :
        );
    }
    return n;
}
Inline assembly in C is ugly compared to Rust, isn’t it? The logic is relatively simple. We just write the whole buffer at once. We communicate this to the calling process by returning n.
device_release
The last function is also fairly simple.
int device_release(struct inode * ino, struct file * f) {
    pr_info("%s called", __FUNCTION__);

    // Non-atomic access is fine as there can only be one thread in this
    // function.
    device_is_opened = 0;
    return 0;
}Hint: Those were the most relevant snippets. Again, I’d like to forward you to my GitHub to see it all in combination.
The Testing Infrastructure
Using Nix, I set up a small testing infrastructure consisting of a minimal Linux kernel, a minimal initrd, and a script that starts QEMU with the right settings. The init script inside the initrd executes insmod debugcon.ko to load my driver during runtime. As I mentioned earlier, device nodes under /dev must be made available before they can be used. The interesting lines in nix/initrd.nix are:
# ...
insmod ${debugconKernelMod}

# Create device nodes.
mdev -s
# ...
The QEMU run script, which is build with $ nix-build -A runQemuDemo, will take the kernel and the initrd, which contains the out-of-tree module, as parameters and start a VM with them. In nix/run_qemu_demo.nix, we can see how this is done:
{ kernel
, initrd
, writeShellScriptBin
, qemu
}:
let
kernelPath = "${kernel}/bzImage";
initrdPath = "${initrd}/initrd.gz";
qemuBin = "${qemu}/bin/qemu-system-x86_64";
in
writeShellScriptBin "run_qemu_demo" ''
${qemuBin} \
-kernel ${kernelPath} \
-append "console=ttyS0" \
-initrd ${initrdPath} \
-serial stdio \
-debugcon file:debugcon.txt \
-display none `# relevant for the CI` \
-m 512M
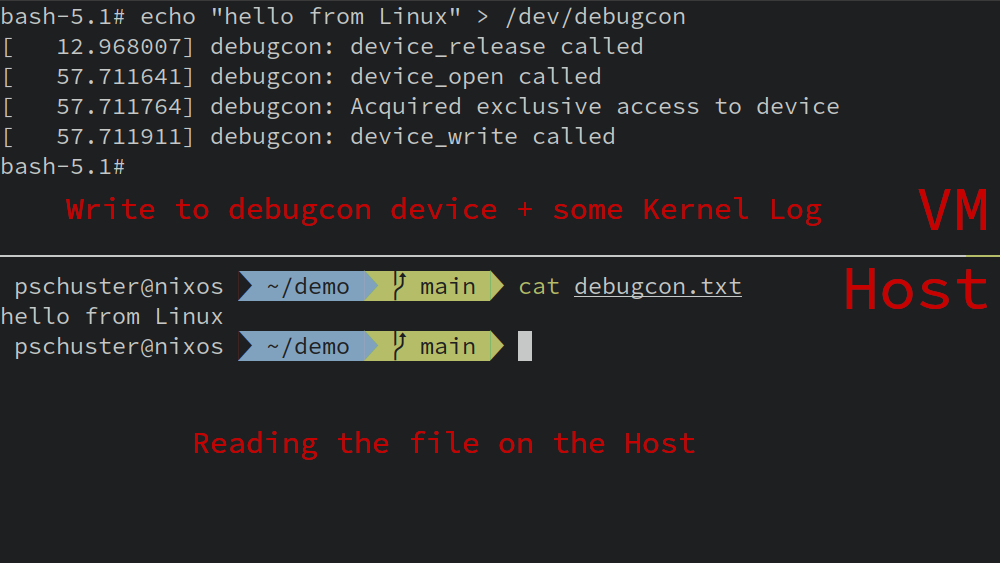
''In the following screenshot, you can see a terminal to the running VM on the top and a host terminal on the bottom. The guest writes a message to the debugcon device and the host can read it, as QEMU wrote everything into the given file.
Summary
In this blog post, I showed the key aspects of a Linux driver for QEMU’s debugcon device. I also sketched the testing infrastructure with Nix around it, which is very convenient. You can find the whole code and a README that helps you to run it on your machine in the GitHub repository: https://github.com/phip1611/qemu-debugcon-linux-driver
0 Comments